

Dedicate new pool master, where UUIDOfHost is the new host you wish to be the master
xe pool-designate-new-master host-uuid=UUIDOfHost
Add a host to an existing pool
xe pool-join master-address=111.111.111.111 master-username=USERNAME master-password=PASSWORD
Set the default Storage Repository
xe pool-param-set uuid=[POOL UUID] default-SR=[SR UUID]

#Example
xe pool-param-set uuid=ace1854e-b462-6bad-3a6e-a6f236784bb9 default-SR=64cdecfa-cfa4-b0dc-1bb6-9c95379c0e23
Get a list of installed XenServer drivers inside Power Shell
Get-WmiObject Win32_PnPSignedDriver | select devicename, driverversion | where {$_.devicename -like "*xenserver*"}

Start XenServer / XCP management services in safe mode (required if installing the drivers/tools in safe mode). Done from command prompt
REG ADD "HKLM\SYSTEM\CurrentControlSet\Control\SafeBoot\Network\XenSvc" /VE /T REG_SZ /F /D "Service"
REG ADD "HKLM\SYSTEM\CurrentControlSet\Control\SafeBoot\Network\InstallAgent" /VE /T REG_SZ /F /D "Service"
Manual install of XenServer tools into a guest. When the operating system can't be detected or is unsupported, you can run the following to force the tools to be installed on the guest. Mount the CD, go into the directory. Listed below is an incomplete list of distributions.
./install.sh -d DISTRIBUTION -m MAJOR_VERSION
./install.sh -d sles -m 11
| Distribution | DISTRIBUTION tag(s) | MAJOR_VERSION versions |
| Red Hat Enterprise Linux | rhel | 5, 6, 7 |
| Centos | centos | 5, 6, 7 |
| Suse Linux | sles | |
| Debain Linux | debian, | 6, 7, 8, testing |
| Ubuntu | ubuntu | 10, 11, 12, 13, 14 |
Get or set a XenServer XCP Params (UUID is VM UUID)
xe vm-param-list uuid=9fb28886-73b2-9c9c-1db9-85ec73a551b4xe vm-param-set uuid=9fb28886-73b2-9c9c-1db9-85ec73a551b4 uuid other-config:foo=baaUsing a local repository for ISOs
Add a ISO manually to the same repository as where guest tools is. This is useful when a NFS or SMB repository is not available. Note: There is limited space, so be mindful of this
On the XenServer/XCP host create an ISO storage repository
# Create the directory
mkdir -p /opt/xensource/packages/iso_import/TheName

xe sr-create name-label=TheName type=iso device-config:location=/opt/xensource/packages/iso_import/TheName device-config:legacy_mode=true content-type=iso
You can copy from a Windows machine using Putty PSCP (Google it) (where 111.111.111.111 is the destination XenServer/XCP Server)
pscp theiso.iso [email protected]:/opt/xensource/packages/iso_import/TheName/theiso.iso
On the XenServer/XCP host, scan the repository to show the ISOs
#Find the repository
xe sr-list

uuid ( RO)                : 5837c5d4-0dfd-f3cb-7f0d-505869cb0fd6
          name-label ( RW): TheName
    name-description ( RW):
                host ( RO): hostname
                type ( RO): iso
        content-type ( RO): iso

#Scan the repository
xe sr-scan uuid=5837c5d4-0dfd-f3cb-7f0d-505869cb0fd6

#You should now see the ISOs in the repository with
xe vdi-list
Add an iSCSI LUN to XenServer/XCP Manually
We have had an issue where we can't add an iSCSI LUN through XenCenter, a work around is to add it manually.
Probe for available LUNs, this will give you an XML readout of what is available. Choose the correct IQN. In this example, target is 10.23.0.50
xe sr-probe type=lvmoiscsi device-config:target=10.23.0.50
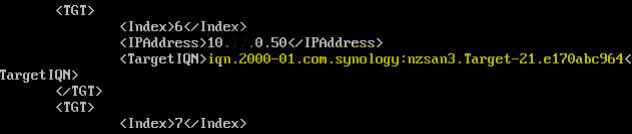
Get the iSCSI info, this will provide the SCSIid
xe sr-probe type=lvmoiscsi device-config:target=10.23.0.50 device-config:targetIQN=iqn.2000-01.com.synology:nzsan3.Target-21.e170abc964
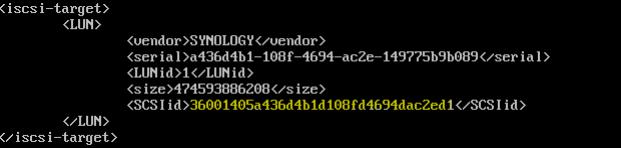
Add a the single LUN to the server
xe sr-create name-label="aci-meta" type=lvmoiscsi shared=true content-type=user device-config:target=10.23.0.50 device-config:port=3260 device-config:targetIQN=iqn.2000-01.com.synology:nzsan3.Target-21.e170abc964 device-config:SCSIid=36001405a436d4b1d108fd4694dac2ed1
Example of adding multiple paths to a LUN (Multipathing). where 10.60.x.x is the destination interface on the SAN, in this case we have 4
xe sr-create name-label="SAN" type=lvmoiscsi shared=true content-type=user device-config:target=10.16.0.12,10.16.1.12,10.16.0.13,10.16.1.13 device-config:port=3260 device-config:targetIQN=* device-config:SCSIid=36006016032e2490061648b60a82675f7

Xen Tools
Allowing Windows Update to reboot automatically multiple times when updating Xen Tools with Windows Update.
From an Administrator command prompt on the Windows VM, run the following command:
Option 1
reg add HKLM\System\CurrentControlSet\Services\xenbus_monitor\Parameters /v AutoReboot /t REG_DWORD /d 3
3 is the recommended value, but you can change the value of the /d parameter to any integer.
Option 2
Or, if your Windows VM is configured to allow remote access, you can run the following command from an Administrator command prompt on another system:
reg add \\\HKLM\System\CurrentControlSet\Services\xenbus_monitor\Parameters /v AutoReboot /t REG_DWORD /d 3
3 is the recommended value, but you can change the value of the /d parameter to any integer.
Option 3
Setting the key by using the Registry Editor
- From the Windows Start menu, type regedit.
- Select to open the Registry Editor
- Navigate to the key: HLKM\System\CurrentControlSet\services\xenbus_monitor\Parameters
- Create a new subkey of the type REG_DWORD with the name: Autoreboot
- Set the value to an integer, For example, 3.
When getting a message that the log volume is full
Inside the XenCenter/XCP console we were getting messages that he log volume had reached capacity.
To resolve this, we looked at the sizes of the volume and found that the /var/log/sa directory was consuming about 1.3GB, which was relatively high for a small 3GB log volume. We identified the large files, reduced the size that was currently being consumed and then reduced further growth of this directory by limiting the accounting job to every 30 minutes down from 10 minutes.
##### /var/log/sa directory large. How to reduce the size #####
# View size
sar -A -f /var/log/sa/sa19
sar -d -f /var/log/sa/sa19     # disk detail (often the size culprit)

## Reduce size now ##

# (Optional) pause collection during maintenance
sudo systemctl stop sysstat 2>/dev/null || true

# Compress old daily reports (they’re plain text)
sudo find /var/log/sa -name 'sar[0-9][0-9]' -type f -mtime +1 -exec gzip -9 {} \;

# Keep only last 14 days of binaries and reports (adjust N as you like)
sudo find /var/log/sa -type f -mtime +14 -delete

# resume
sudo systemctl start sysstat 2>/dev/null || true

## Fix for further growth ##
# Reduce /var/log/sa directory, limit to 30 minute increments - Do this by reducing the activity of the accounting
vi /etc/cron.d/sysstat

# Modify the following lines
# Run system activity accounting tool every 10 minutes
*/10 * * * * root /usr/lib64/sa/sa1 1 1

# To
# Run system activity accounting tool every 30 minutes
*/10 * * * * root /usr/lib64/sa/sa1 1 1
Allow Citrix to restart a server multiple times when installing updates
When windows driver updates are applied to a server for XenServer/XCP, the server will only restart once. There have been occasions that the server needs to restart a number of times to allow the driver install to complete. Do do this, a registry key needs to be created.
# Create a .reg file with the text below
reg add HKLM\System\CurrentControlSet\Services\xenbus_monitor\Parameters /v AutoReboot /t REG_DWORD /d 3
# Or manually create the registry key
Location: HKLM\System\CurrentControlSet\Services\xenbus_monitor\Parameters
Type: REG_DWORD
Name: AutoReboot
Value: 3
When all paths don't connect
We had an issue with XenServer multipathing with a new storage repository. Not all of the paths would connect as expected, XenServer on each of the nodes wouldn't even attempt to use the second paths. This looked like it was due to the old paths being cached.
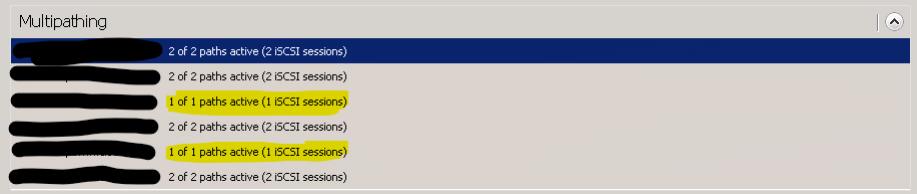
Run the following commands to restart the XenServer stack and refresh the iSCSI connections
xe-toolstack-restart

iscsiadm -m discovery -t sendtargets -p 10.1.0.55,10.1.0.56