
Useful Cisco IOS commands
Created: 2019-01-09 01:43:04 | Last modified: 2026-01-29 01:49:35Access: Read | Views: 292 | Rating: N/A | Tags: cisco
Here is a list of commands useful for Cisco
IOS Commands
General
DHCP
sh ip dhcp binding #Get a list of DHCP leases
Ping via VRF (Mgmt-intf is the VRF in this example)
ping vrf Mgmt-intf 111.111.111.111
NAT - When unable to negate a NAT rule, you need to clear the translation
conf t
do clear ip nat translation *
no ip nat inside source static tcp 192.168.0.12 443 111.111.111.111 443 extendable
ip nat inside source static tcp 192.168.0.10 443 111.111.111.111 443 extendable
View active connections to the router
#Enable IP accounting on the interface you wish to monitor
conf t
interface GigabitEthernet0/1.100
 ip accounting
end

#Show the accounting/statistic info
sh ip accounting

#Clear the counters
clear ip accounting
Trunking with native VLANs 802.1Q - In this example, we allow a trunk for vlans 10, 25 and 26. But for a device that doesn't have trunking enabled, it will default to VLAN 10
interface GigabitEthernet1/0/24
 description Trunk + native access on VLAN 10
 switchport
 switchport trunk allowed vlan 10,25,26
 switchport trunk native vlan 10
 switchport mode trunk

# Additional config if required
 switchport trunk encapsulation dot1q        ! (only on older IOS that still needs it)
 switchport nonegotiate                      ! (recommended when the far end isn't Cisco/DTP)
 spanning-tree portfast trunk                ! (only if this is an edge device, not another switch)
 spanning-tree bpduguard enable              ! (optional safety if it's an edge)
Passwords
Encrypt all passwords on system. This will encrypt all existing passwords. If this is negated, passwords will remain encrypted.
service password-encryption
Users
With cisco IOS you can create a user and then set permission levels. You can also allow the telnet user to login using these credentails
#Create The User (when creating an unencrypted password)
user admin privilege 15 secret THEPASSWORD

#Use secret instead to create users, this will create an encrypted password
username admin secret THEPASSWORD
#Set the telnet session so created users can login
line vty 0 4
  login local
SSH
You can create ssh access using the following
# Create the domain and add an RSA cert
ip domain-name domain.local
crypto key generate rsa

# Generate with 2048 bit key
ip ssh version 2

# Create a policy to only allow access from a management VLAN
ip access-list extended VTY_ACCESS
 10 permit tcp 10.5.0.0 0.0.0.255 any eq 22

# Add the access to VTY
line vty 0 4
 access-class VTY_ACCESS in
 login local
 transport input ssh
Clock
# conf t - Set the NTP server sync
ntp server pool.ntp.org version 2 prefer

# conf t - Set the time zone and daylight savings (example as NZ daylight savings time)
clock timezone UTC 12 0
clock summer-time NZDT recurring last Sun Sep 2:00 1 Sun Apr 3:00

# Get the clock to confirm changes have been made correctly
show clock
Get MAC address table from switch
Where the INTERFACE is e.g. GigabitEthernet4
show mac address-table interface INTERFACE
Show all connected MAC addresses (not ARP)
show mac address-table
Lock MAC address to physical port
conf t
int gi1/1/1
 switchport port-security mac-address MACADDRESS
Kron - Scheduled Commands
With ISO you can schedule commands to be run, like Linux CRON or Windows scheduler. Some limits apply, for example you can't edit a sub interface. Here is an example of clearing l2tp tunnels.
# Set the kron policy and the command to run. The command follows the cli keyword
kron policy-list clearl2tp
 cli clear l2tp all
 exit

# In this example you schedule the command every Monday at 22:00
kron occurrence clearl2tp at 22:00 Mon recurring
 policy-list clearl2tp

# In this example, the kron will happen once at 2am an December 15th
kron occurrence clearl2tp at 2:00 Dec 15 oneshot
 policy-list clearl2tp
Bandwidth
How to limit the bandwidth on an interface
#Limit to 200Mb/s example
conf t
policy-map LIMIT
  class class-default
    police 200000000
interface GigabitEthernet0/1
  bandwidth 200000
  service-policy input LIMIT
  service-policy output LIMIT
IPv6
To enable IPv6 on a cisco router, enter in the following command in the config
ipv6 unicast-routing
LACP - Port Channel
Get a summary of the LACP/Port-Channels on a Nexus switch
show port-channel summary
Get port channel traffic
#  Show port channel traffic for all interfaces or a single interface
sh port-channel traffic
sh port-channel traffic interface port-channel 70

# Clear port channel counters to provide more accurate results
clear counters
clear counters interface port-channel 70
Routing & BGP
Graceful shutdown of a peer, this will reduce any convergence time by allowing the link to drain.
111.111.111.111: is the peer IP address
60: is the time in seconds
20: the local preference to set while shutting down the peer
router bgp asnumber
neighbor 111.111.111.111 shutdown graceful 60 local-preference 20
Show the route taken to reach a destination where 111.111.111.111 is the destination address
show ip route 111.111.111.111
Show the BGP route taken to reach a destination where 111.111.111.111 is the destination address
show ip bgp 111.111.111.111
Show prefix advertisements to a BGP peer where 222.222.222.222 is the BGP peer
sh ip bgp neighbors 222.222.222.222 advertised-routes
IPSEC
Get the status of an IPSEC VPN connections. Brief and Detailed views available.
show crypto session brief
show crypto session detail
Clear all active IPSEC VPN connections
clear crypto sa
L2TP - For LNS
Clear a single user interface
# Get the interface to clear
sh l2tp sess | inc username

# Clear the interface
clear interface virtual-access 3.80
Get a list of L2TP tunnels or sessions
# Tunnels
show l2tp tunnel

# Sessions
show l2tp session
Clear the tunnels (useful for testing a LNS failback)
# Clear a single tunnel
clear vpdn tunnel l2tp id theid

# Clear All tunnels
clear vpdn tunnel l2tp all
Netflow
Get flow statistics
sh flow exporter statistics
Cisco Speed/Throughput/Bandwidth Test - Use TTCP
On the router
router>ttcp
transmit or receive [receive]:
transmit

!-- Remote device
Target IP address: 111.111.111.111

!--- Number of buffers to transmit is set to 50
perform tcp half close [n]: use tcp driver [n]: send buflen [8192]: send nbuf
[2048]: 50

bufalign [16384]: bufoffset [0]: port
[5001]: sinkmode [y]: buffering on writes [y]: show tcp information at end [n]:
ttcp-t: buflen=8192, nbuf=50, align=16384/0, port=5001 tcp ->10.1.1.52
ttcp-t: connect (mss 1460, sndwnd 4096, rcvwnd 4128)
On the Windows/Linux box
Download NTttcp application from https://gallery.technet.microsoft.com/NTttcp-Version-528-Now-f8b12769
# Example usage
ntttcp.exe -s -m 8,*,111.111.111.112 -l 128k -a 2 -t 15
DCI Link between datacenters with a VPC
Here is an example to get a DCI link up and running between two datacenters using two VPCs. The VPCs must be on different domains. We select edge and bpdufilter as bdpu can't be run over the DCI.
interface port-channel5
  description DC Link
  switchport
  switchport mode trunk
  switchport trunk allowed vlan 30,2000
  spanning-tree port type edge
  spanning-tree guard root
  spanning-tree bpdufilter enable
  speed 10000
  duplex full
  vpc 5
Debugging port traffic on a Cisco router
We had an instance where DMVPN traffic wasn't being passed between sites, we weren't sure if the ISP was allowing the traffic through. So on the hub endpoint we logged traffic. This is the configuration we used to view the traffic. In this example, 111.111.111.111 is the spoke we are monitoring where 222.222.222.222 is the hub/endpoint of the traffic.
conf t
access-list 160 remark Port testing
access-list 160 permit udp host 222.222.222.222 host 111.111.111.111 eq 500
access-list 160 permit udp host 222.222.222.222 host 111.111.111.111 eq 4500
exit

# Debug the packet
terminal monitor
debug ip packet detail 160

# Disable debug and monitoring
undebug all
terminal no monitor
Catalyst 1300 Series
An example of an initial switch configuration for a Cisco 1300 series switch. Once configured you will be able to access the switch to manage, encrypts all passwords, creates a user for access
Parameters - Change these as per your requirements, highlighted in yellow
| SWITCHNAME | The hostname of the switch |
| 22,45,55 | List of VLANs you would like on a switch separated by commas e.g. 22,45,55 |
| 22 | The vlan used for management |
| 192.168.1.5 255.255.255.0 | The management IP and netmask e.g. 192.168.1.5 255.255.255.0 |
Configuration
The initial configuration on the switch will ask for a username and password, enter these in.
conf t

macro auto disabled
hostname SWITCHNAME
ip ssh server

vlan 22,45,55

ip default-gateway 192.168.1.1

int vlan 22
 name Management
 ip address 192.168.1.5 255.255.255.0
SNMP setup
snmp-server server
snmp-server community maccom1 RO
snmp-server location The Address
snmp-server contact "[email protected]"
Commands
# Show CPU information
show cpu utilization

# Show Memory information
show memory

# Show combined resources
show system
Debugging Cable Issues (Copper)
# Debug errors on an interface e.g. gi1/0/30
show interfaces counters gi1/0/30

# Debug/Test cable e.g. gi1/0/30
test cable-diagnostics tdr interface gi1/0/30

# Show results e.g. gi1/0/30
show cable-diagnostics tdr interface gi1/0/30
# Result: Open cable, length 16 meters. This means there is a cable break, bad connector at 16 meters away from the switch


# A successful test would like like this


Cisco 1300 series stacking
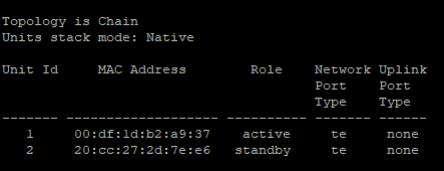
Show an existing stack, this will show all units in the stack
sh stack
Replacing a unit
To replace a faulty unit or add to the stack, you need to configure the stack ports on the secondary (new) unit (primary unit is already configured)
# Enter configuration
conf t

# We are using ports 21 and 22 as stacking ports
stack configuration links te 21-22

# Set this unit to be unity number 2
stack configuration unit-id 2

# Save config
Check the configuration
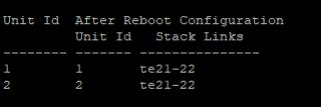
sh stack configuration
The configuration will look similar to below, once the secondary unit is rebooted
Unit Id  After Reboot Configuration
         Unit Id   Stack Links
-------- ------- ---------------
1        2       te21-22
# Save and Restart the switch
copy run start
reload
Once the switch has rebooted, you'll see the stack indidcator LEDs show the new unit is unit 2
On Master Unit - Check stacking
If you do a show stack configuration on the master unit, you should see the following
Failed Primary Unit
If the primary unit has failed, you can access the secondary unit and set it as unit ID 1 (the master) and reboot. Then adding additional switches as per above.