

A list of useful commands that can be used within the ACI CLI, more can be found on the Acronis page here.
Run an Acronis vstorage TOP. Where cluster-name is the name of the storage cluster.
vstorage -c cluster-name top
Delete the iscsi connection
vinfra node iscsi target delete --node aci1 iqn.2000-01.com.name:san.Target-2.e170assga
Create the connection
vinfra node iscsi target add --portal 10.17.0.50:3260 --node aci1 iqn.2000-01.com.name:san.Target-2.e170assga
Show tasks for connect and disconect
vinfra task show TASK_ID
View ACI startup mounts for vstorage
cat /etc/vstorage/fstab
Get and enable/disable write caching on drives. In this example we are checking /dev/sda
# Check if caching is active on drive
hdparm -W /dev/sda

# Disable caching for the selected drive
hdparm -W0 /dev/sda

# Restart the user agent service on the problemed node, this will re-read the disk status
systemctl restart vstorage-ui-agent
View the last 100 lines for a log file
cd /var/log/vstorage/servername/mds-name
zstdcat mds.log.zst | tail -100
Using smartctl to view details and status of a hard drive (In this example /dev/sdd)
The highlighted areas below after viewing the results, shows good indication that the drive is failing and should be replaced.
# View information about a drive
smartctl -i /dev/sdd

# Run a short test | Other available tests short|long|conveyance|select
sudo smartctl -t short /dev/sdd


# View SMART (S.M.A.R.T) status of a drive / test results
smartctl -a /dev/sdd

SMART Attributes Data Structure revision number: 16
Vendor Specific SMART Attributes with Thresholds:
ID# ATTRIBUTE_NAME          FLAG     VALUE WORST THRESH TYPE      UPDATED  WHEN_FAILED RAW_VALUE
  1 Raw_Read_Error_Rate     0x000b   100   100   001    Pre-fail  Always       -       7
  2 Throughput_Performance  0x0004   138   138   054    Old_age   Offline      -       92
  3 Spin_Up_Time            0x0007   082   082   001    Pre-fail  Always       -       375 (Average 375)
  4 Start_Stop_Count        0x0012   100   100   000    Old_age   Always       -       2
  5 Reallocated_Sector_Ct   0x0033   100   100   001    Pre-fail  Always       -       0
  7 Seek_Error_Rate         0x000a   100   100   001    Old_age   Always       -       0
  8 Seek_Time_Performance   0x0004   133   133   020    Old_age   Offline      -       18
  9 Power_On_Hours          0x0012   095   095   000    Old_age   Always       -       35638
 10 Spin_Retry_Count        0x0012   100   100   001    Old_age   Always       -       0
 12 Power_Cycle_Count       0x0032   100   100   000    Old_age   Always       -       2
 22 Unknown_Attribute       0x0023   100   100   025    Pre-fail  Always       -       100
192 Power-Off_Retract_Count 0x0032   100   100   000    Old_age   Always       -       2458
193 Load_Cycle_Count        0x0012   100   100   000    Old_age   Always       -       2458
194 Temperature_Celsius     0x0002   069   069   000    Old_age   Always       -       27 (Min/Max 19/34)
196 Reallocated_Event_Count 0x0032   100   100   000    Old_age   Always       -       0
197 Current_Pending_Sector  0x0022   100   100   000    Old_age   Always       -       8
198 Offline_Uncorrectable   0x0008   100   100   000    Old_age   Offline      -       2
199 UDMA_CRC_Error_Count    0x000a   100   100   000    Old_age   Always       -       0


Error 3 occurred at disk power-on lifetime: 35636 hours (1484 days + 20 hours)
  When the command that caused the error occurred, the device was active or idle.

  After command completion occurred, registers were:
  ER ST SC SN CL CH DH
  -- -- -- -- -- -- --
  40 43 00 00 00 00 00  Error: UNC at LBA = 0x00000000 = 0

  Commands leading to the command that caused the error were:
  CR FR SC SN CL CH DH DC   Powered_Up_Time  Command/Feature_Name
  -- -- -- -- -- -- -- --  ----------------  --------------------
  60 00 58 00 8c 2b 40 08   3d+11:57:42.026  READ FPDMA QUEUED
  27 00 00 00 00 00 e0 08   3d+11:57:39.114  READ NATIVE MAX ADDRESS EXT [OBS-ACS-3]
  ec 00 00 00 00 00 a0 08   3d+11:57:39.114  IDENTIFY DEVICE
  ef 03 46 00 00 00 a0 08   3d+11:57:39.110  SET FEATURES [Set transfer mode]
  27 00 00 00 00 00 e0 08   3d+11:57:39.057  READ NATIVE MAX ADDRESS EXT [OBS-ACS-3]

SMART Self-test log structure revision number 1
Num  Test_Description    Status                  Remaining  LifeTime(hours)  LBA_of_first_error
# 1  Short offline       Completed: read failure       90%     35638         -
You can get the hard drive by going to the node and clicking on storage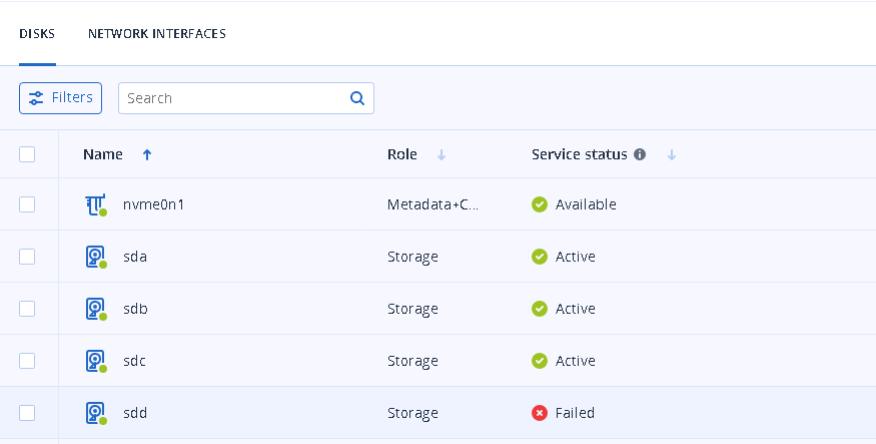
When a resize doesn't work because the volume is too large it can be because Acronis times out when adding the drive. It does a mkfs on the drive and as the drive is large it times out, even although the mkfs.ext4 is running in the background.
Do the following;
- Once the operation has timed out and you can no longer see the mkfs.ext4 process running in the background on the large volume
- Create a smaller drive (about 100GB in size) inside iSCSI, switch the large LUN volume for the 100G LUN.
- Reboot ACI and you will see the new 100GB volume in storage.
- Assign the 100GB volume to Acronis and let it add it to the storage volume list.
- Once assigned, run through the following procedure.
# Single user mode
systemctl start network
systemctl start iscsi
lsblk
mount /dev/sda1 /vstorage/6c29dcac

# Copy the created directories from the temp drive to a temp directory
cd /vstorage/6c29dcac
mkdir /bak
cp -Rp . /bak/

# Get all the block ids and note down the /dev/sda1 one
blkid
/dev/sda1
/dev/sda1: UUID="6c29dcac-fa92-4868-8167-326a723f61" TYPE="ext4" PARTUUID="e31anc199-f9be-47c3-96a7-55e9ea117f9f"

# Switch out drives
umount /dev/sda1
systemctl stop iscsi

# Replace the disk and reboot into single user mode again
systemctl start network
systemctl start iscsi
lsblk
mount /dev/sda1 /vstorage/6c29dcac

# Copy the temp data back, make sure files are there as expected
cd /bak
cp -Rp . /vstorage/6c29dcac/
cd /vstorage/6c29dcac/
ls #make sure all files are there

# Next to set the block ids
blkid
/dev/sda1: UUID="6c29dcac-8161-4149-8cbc-32264sge7b857" TYPE="ext4" PARTUUID="f78c3sfe-a3f1-49eb-9a1a-d98490e6871b"
vim /etc/vstorage/fstab
#Replace the UUID in the fstab with the new UUID
#Reboot

# Once rebooted, remove the /bak folder
# Once logged in you should see the new drive size being reported
You can view the logs inside the ACI nodes
Link to the locations of the logs
S3
To view access to S3 via web
tail -f /var/log/nginx/access.log
Throttling
Fix throttle in ACI 1 - https://kb.acronis.com/content/68284
ls /mnt/vstorage/vols/acronis-backup/conf.d
echo "storage.ostor.max_not_pushed = 107374182400" > /mnt/vstorage/vols/acronis-backup/conf.d/max_not_pushed.conf
systemctl restart vstorage-abgw
systemctl status vstorage-abgw
Check if throttling is being applied to the backup gateway. If you keep running the command, you will see that the last line total (2761179) will keep incrementing if throttling is being applied.
curl -s http://127.0.0.1:44444/metrics | grep "abgw_append_throttle_delay_ms_total"
# HELP abgw_append_throttle_delay_ms_total sum of delays injected into appends because of low storage space
# TYPE abgw_append_throttle_delay_ms_total counter
abgw_append_throttle_delay_ms_total{} 2761179
As of version 5 of ACI, this can be done via the CLI. Where 10 is the watermark value. Acronis doesn't recommend going below 5 as it may impact storage performance
echo "storage.space_low_watermark = 10" > /mnt/vstorage/vols/acronis-backup/conf.d/throttling_params

systemctl restart vstorage-abgw
Note: This is not recommended by Acronis as the recommended way to increase storage is to add additional ACI nodes whether they be virtual of physical. This has been done in a lab environment.
If you have already allocated iSCSI storage for the ACI node, but then need to allocate more, there isn't anywhere within the GUI or using the vinfra command to allow the expand. We had issues assigning a 100TB iSCSI LUN to ACI, basically it would keep timing out when assigning and we could see a mkfs.ext4 process was running for a long time even although the original tasks had failed. Even when the mkfs process finished, the storage couldn't be assigned. The workaround for this was to assign a 1TB storage volume to ACI (anything larger would timeout) and then resize on the SAN and run though the following procedure for the larger storage to be utilized. Note: this was done on an empty ACI volume, make sure you have backups of data before continuing.
Also note, you need to allocate enough initially so that there are enough inodes for the additional storage, otherwise parts of this procedure won't allocate the full amount of storage available.
After increasing your SAN volume size, first put the node into single user mode noted here
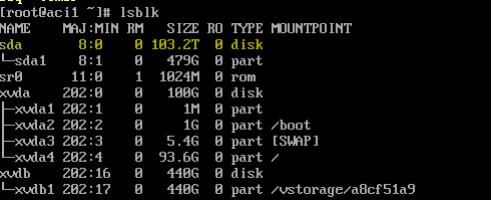
Run the following commands, the first is to start the network and the second is to get an iSCSI connection, the third will show you that the iSCSI volume is attached along with partition sizes.
systemctl start network
ping
systemctl restart iscsi
lsblk
Next we need to resize the partition using parted.
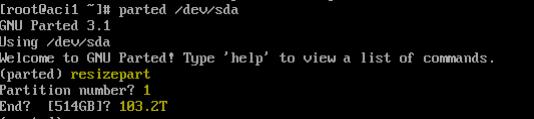
If you get the following error messages, enter in Fix

Once done, quit parted with 'quit'
Run e2fsck to check the file system

Now we need to resize the partition, use resize2fs /dev/(device name)
resize2fs /dev/sda1
Now reboot
It will require enabling encryption for your chunk services (CS). Please note that encryption can only be enabled or disabled for newly created CS. If you want to encrypt existing CS, you'll need to release them from their current tier and re-add them to an encrypted tier.
To illustrate, if your current CS are on Tier 0 and encryption is not yet enabled for Tier 0 on your primary cluster, you'll need to enable it first. Then, you can try to gracefully release each unencrypted CS on Tier 0 and re-add it back to Tier 0, taking into account your storage capacity and replication policy setup.
To enable tier encryption, follow these steps:
- Go to Settings -> System settings -> Storage encryption.
- Turn on the toggle switch to Enable AES-256 encryption for data stored on disks.
- Select the tiers you want to encrypt and click Save.
You can find more information on enabling data encryption in the Acronis Cyber Infrastructure 6.1 Admin Guide: https://dl.acronis.com/u/software-defined/html/AcronisCyberInfrastructure_6_1_admins_guide_en-US/#enabling-data-encryption.html#Admin%20panel
Acronis ABGW in ACI uses certificates between each cluster and the Cyber Protect Console. To renew the cert
In ACI => Storage services => Backup storage => Registrations => <edit> => Update certificate
You will need to enter in your Acronis service credentials to allow the cert to renew

Or via command line - Change reg-server to your server
vinfra service backup cluster renew-certificates --reg-account <account> --reg-server https://au-cloud.acronis.com/ --stdin